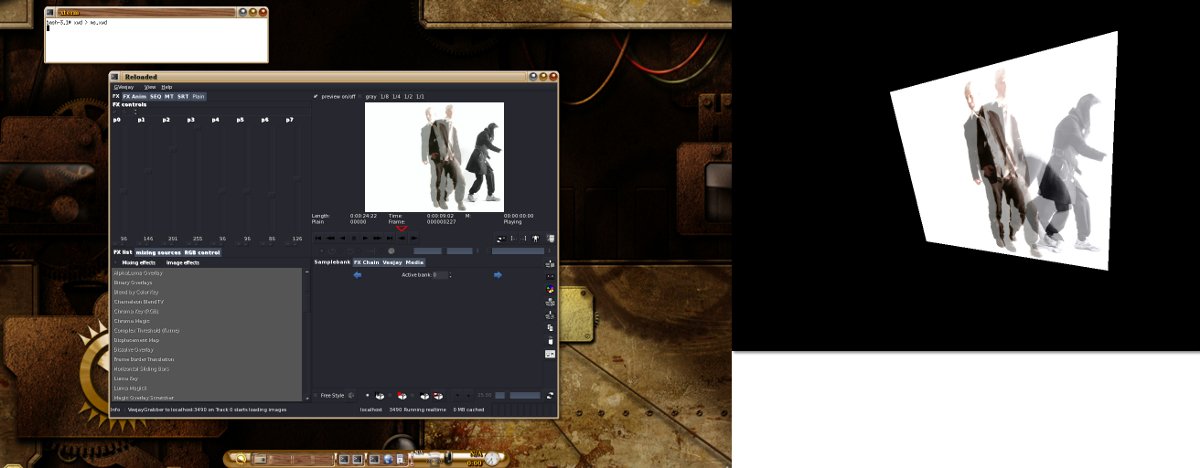
videowall veejay

Videowall in veejay

Requires: lvdshared from pluginpack (https://github.com/c0ntrol/veejay/tree/master/veejay-current/plugin-packs/lvdshared)

You can setup a video wall by starting multiple veejays. One of the veejays must be the master veejay, responsible for deciding which veejay renders what part of the image. Only the master requires a special command-line option and a file to read its configuration from. The other veejays can be started normally.

First, to setup a video wall you need to write a configuration file that lists the veejay connections:

screen=2x3
row=0 col=0 port=4490 hostname=localhost
row=0 col=1 port=5490 hostname=localhost
row=0 col=2 port=6490 hostname=localhost
row=1 col=0 port=7490 hostname=localhost
row=1 col=1 port=8490 hostname=localhost
row=1 col=2 port=9490 hostname=localhost

Then, you continue starting 6 more veejays. If you start them on other machines, change the hostname resp. or enter an ip address.

If the other veejay is running locally, veejay will share its memory otherwise the image part is send through the network.

Finally, you start the master veejay by invoking the --split-screen option.

veejay --split-screen -a0 -Z6

Examples: (test/videowall/videowall.sh)

#!/bin/bash
# split screen configuration file is in $HOME/.veejay/splitscreen.cfg

# write new config file!
cat << EOF > $HOME/.veejay/splitscreen.cfg
screen=2x3
row=0 col=0 port=4490 hostname=localhost
row=0 col=1 port=5490 hostname=localhost
row=0 col=2 port=6490 hostname=localhost
row=1 col=0 port=7490 hostname=localhost
row=1 col=1 port=8490 hostname=localhost
row=1 col=2 port=9490 hostname=localhost
EOF
# end of writing new config file

# start the individual screens

veejay -d -a0 -w 240 -h 288 -D -p4490 &
veejay -d -a0 -w 240 -h 288 -D -p5490 &
veejay -d -a0 -w 240 -h 288 -D -p6490 &
veejay -d -a0 -w 240 -h 288 -D -p7490 &
veejay -d -a0 -w 240 -h 288 -D -p8490 &
veejay -d -a0 -w 240 -h 288 -D -p9490 &


sleep 5

# start the master screen

veejay --split-screen -d -a0 -Z6 -w 720 -h 576

read more »


veejay environment variables

You can specify various environment variables to change veejay's behaviour.

VEEJAY_FULLSCREEN0 or 1Always starts veejay in fullscreen mode (usefull for installation mode)
VEEJAY_SCREEN_SIZEWidthXHeightSize of the video window in Twinview/One BigDesktop mode
VEEJAY_SCREEN_GEOMETRYWidthXHeight+XOffsetxYOffsetGeometry of your desktop and X/Y offset for video window
VEEJAY_CAPTURE_DRIVERunicap or v4lutilsSpecifies capture driver to use
VEEJAY_PERFORMANCEquality or fastestChoose between quality or speed

###Examples

Currently undergoing review at [https://github.com/c0ntrol/veejay/issues/27]

TwinView setup, Screen 0:1600x1024 Screen1: 1024x768
[

$ export VEEJAY_DESKTOP_GEOMETRY=2624x1024+0x0  
$ export VEEJAY_VIDEO_SIZE=1024x768  
$ export VEEJAY_VIDEO_POSITION+1600x0
$ export VEEJAY_PERFORMANCE=quality  
$ veejay -v -w1024 -h768 myvideo.avi  

`

read more »


Veejay Advanced

###Plugins

Veejay can load both LiViDo and Frei0r plugins.On 32-bit systems, there is also support for FreeFrame. By default,veejay looks in a few common locations to find your plugins. Also, you can configure additions paths to look for plugins:

$ mkdir ~/.veejay
$ vi ~/.veejay/plugins

The contents of the file can look like:

/usr/local/lib/freeframe
/usr/local/lib/frei0r-1

Veejay will pick up the plugins the next time you start it.

##VIMS

VIMS is veejay's internal message system - its simple and in plain ASCII.
All control data is distributed via VIMS. Each (atomical) message consists of an Action Identifier and a list of zero or more Arguments which can be used to control Video Clips, Video Streams, the Effect Chain and many other things.
Reloaded, veejay's client, uses a dual socket to read status and write back VIMS
messages.

VIMS allows events to be triggered through:
SDL Keyboard Event (libsdl)
OSC (Open Sound Control)
And Itself

After intalling veejay, you will have a commandline utility 'sayVIMS' which you
can use to send text messages.

Use the command
$ veejay -u -n |less
to dump all VIMS messages.

###The Message Format

A message is described as:

: ;

Examples:

080:;  
099:0 0;  

The action identifier is a 3 digit number describing a Network Event
The colon is used to indicate the start of the Argument List and must be given.

The Argument List is described by a printf() style formatted template
which describes the number and type of arguments to be used.

The semicolon must be given to indicate the end of this message

###Reserved Values
Some reserved numbers:

clip id0select currently playing sample
clip id-1select highest sample number
chain entry-1select current chain entry
stream id0select currently playing stream
stream id-1select highest stream number
key modifier0 = nonone, 1= alt , 2 = ctrl, 3 = shift
frame-1use highest possible frame number
playback mode0 = clip, 1 = stream, 2 = plain
data formatyv16 (yuv 4:2:2 raw) , mpeg4, divx, msmpeg4v3,div3, dvvideo, dvsd, mjpeg, i420 and yv12 (yuv 4:2:0 raw)
loop type0 = no looping, 1 = normal loop, 2 = pingpong (bounce) loop

###Images

Using images as a source

Veejay currently supports jpeg, png and bmp images as a source, meaning you can mix static images with moving video.

Writing images

Making screenshots (scales and save image to file)

330: ;

for example

$ sayVIMS "330:640 480 screenshot.png;"

###Sound output

Veejay plays audio through Jack

You must start the jack server prior to starting Veejay:

$ jackd
$ veejay video-file.avi

If the audio samplerate differs (Jack plays 48Khz, veejay plays 44.1Khz), you need to setup jack in the proper samplerate.

$ jackd -r 44100

###Performance tuning

Veejay's performance depends much on the memory bandwidth, CPU and disk access times.

For HDTV (1280x720) mjpeg, you need at least a 2.5 ghz and 1 GB of RAM. The faster your CPU, the better since decoding is cpu intensive - like some of veejay's FX.

For full PAL/NTSC resolutions (720x576 resp. 720x480) DV/Mjpeg you need at least a 1.5 ghz, for lower resolution (352x288) you can do fine with a 500-800 mhz PC.

If you need to record without framedrop, you can do so by disabling audio and disabling synchronization with the commandline options -a0 -c0

On modern CPU's (i686) your best bet is working in RAW or MLZO (compressed) YUV 4:2:0 / 4:2:2 if you need the little extra for FX rendering.

Typical for laptops is slow diskspeed access, on my 1.8 ghz dell latitude laptop the best I get is an average of about 20.0 mb/sec which is barely sufficient for playing full PAL avi's containing RAW YUV.

(you can test yours with hdparm -T -t /dev/hdX)

###Caching

Veejay has a caching mechanism that loads (compressed) images from disk into RAM. Frames furthest away from the currently played position will be discarded first when the cache size limit is reached. By default, this limit is set to 30% of your system's memory.

There are two commandline options you can use to change the behaviour of the cache:

-m / --memory [percentage of available RAM to use]

-j / --max_chain [maximum number of simultaneous samples to cache]

If you mix a lot of (short) different samples over eachother, you might want to set "-j5 -m50" . If you would have 100 MB RAM, veejay will consume up to 50%, dividing the memory available for 5 different samples, thus max. 10 MB RAM per sample.

read more »


Veejay Basics

##Rules of Thumb

  • Veejay is the server
  • Reloaded is the client
  • Sayvims is the console mini-client
  • You can interact with the server directly (SDL mouse and keyboard)
  • Veejay's console output logs your actions

###system docs

$ reloaded -h $ veejay -h $ man veejay $ veejay -u

###Various ways to launch the server

In dummy mode (just a stream with black video, hit the color wheel in the Stream pad
to change its color)
$ veejay -d

To open your Video4Linux device, you can do something like
$ echo "240:0 1;" | sayVIMS

Or you can use reloaded, click GVeejay in the Menu, Stream -> New, and doubleclick
your capture device.

To start veejay with a videofile (preferred), you can do something like
$ veejay -v mjpeg-video-file.avi

###Solo'ing the server

All the keybindings in veejay depend on SDL; if you move your mouse over to the
SDL windows to focus it you can interact directly with the output.

KP= Numeric KeyPad, check numlock.

Create new sample from your entire video file and play it by pressing:
KP1, Left Bracket, KP3, Right Bracket , F1

If you press 'KP divide' , veejay will return to plain video mode so you can create more clips. If you press 'ESC' , veejay will switch from playing streams to playing clips or vice versa

Press F1 to F12 to select a clip,
Press 1 to 9 to select a bank (1 = clips 1 to 12, 2 = clips 12 to 24, etc )

Once you are playing a clip/stream, simply press 'Cursor UP' , 'ENTER'
If you add a video effect, try pressing '-' and '=' to select another channel and '/' to
toggle between clip/stream sources

Veejay supports chaining of effects since day 0, a number of keys have some importance

'-' ,'=' and '/'
'END' for enabling/disabling the chain
'KP -' for selecting the previous entry
'KP +' for selecting the next entry
'ENTER' for adding an effect from the list to the chain
'DEL' for removing an effect from the chain

Also, you can press 'HOME' to see clip or stream information. Try the keys 'A' to 'L' to increase/decrease playback speed, Press ALT + 'A' to 'L' to increase/decrease
slow motion speed.

Some keyboard bindings

DescriptionSDL keyIn plain english
Set the starting position of a new sampleSDLK_LEFTBRACKETLeft bracket
Set ending position and create a new sampleSDLK_RIGHTBRACKETRight bracket
Select and play sample 1SDLK_F1F1
Set playback speed to 3SDLK_dd
Change looptypeSDLK_KP_MULTIPLYasterix on numeric keypad
Play backwardSDLK_KP_4Cursor left on numeric keypad
Play forwardSDLK_KP_6Cursor right on numeric keypad
Skip 1 secondSDLK_KP_8Cursor up on numeric keypad
Switch playmode to PlainSDLK_KP_DIVIDEDivide on numeric keypad
Print information about sampleSDLK_HOMEHome

All keys are listed in
$ man veejay

###Video sampling

If you have started veejay with one or more video file(s) (thus not with $ veejay -d ), you can easily create new samples;

First, Veejay must be running in plain mode

top buttonbar

Then, you can press the In and Out button to set the starting and ending position of a sample ; Pressing the 'Out' button immedialty commits the new sample. The keyboard shortcuts are Left bracket and Right bracket resp.

When a sample is created it has a partial copy of the Edit Decision List; You can change the starting positions by at most -2.0 seconds and the ending positions +2.0 seconds.

After each commit, the starting position of the sample is set equal to the ending position of the last created sample, you can repeatedly press the Out point button to quickly create a series of samples.

navigation buttons

If you have started Veejay in dummy mode, the only way to add videofiles is by GVeejay -> Sample -> New from file.

To play a sample, you can either press one of the F-keys, or doubleclick a sample slot in the samplebank. You can activate up to 120 samples per keyboard; To play in range 12-24, press '2', To play in range 1-12, press '1'. The 'a,s,d,f,g,h,j,k,l' keys can be used for faster playback , ALT + 'a,s,d,f,g,h,j,k,l' for slower playback. To see a full overview of the keyboard comments, use $ man veejay or click View -> VIMS bundles in reloaded which displays a list of all valid events and their bindings).

read more »


Reloaded

###Introduction

Veejay has a client-server architecture. This means that multiple clients can connect to the same veejay server or even multiple servers, possible running on different computers even.

Reloaded is a graphical client for veejay, providing nice buttons and sliders to play with.

###Sample sequencer

Its easy to sequence Samples with Reloaded - and to record the sequence to a new sample.

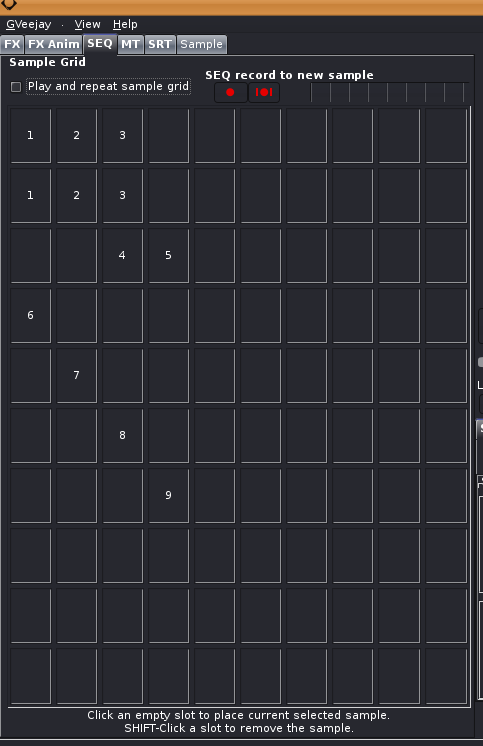
This is how the Sequencer looks like: [caption id="attachment_200" align="aligncenter" width="194" caption="Sequencer"][Sequencer[/caption]

In the 10x10 board below you have 100 slots, in each you can place exactly one sample. First, play the sample you want to sequence and left-mouse click one of the slots. Do so for the other samples you want to sequence. The grid is played from top left to bottom right and empty slots are simply skipped. The play pattern in the grid below is: 1,2,3,1,2,3,4,5,6,7,8,9

You can click the 'Play and repeat sample grid' which will do the obvious, play the pattern.

###Video mixing

Veejay can (down)mix from multiple sources

Method 1/2. Mixing plain samples

To mix 'plain' samples, i.e samples with no FX you can simply add a video effect to the current sample , click it in the FX chain and select a secondary source for it from the FX sources list. This method will not render the FX that may be present on the secondary source. You can use method 2, or play and record the secondary sample to a new sample before mixing.

Method 2/2. Mixing composed samples

To mix 'composed' samples, i.e. samples with all FX rendered, you can use the MT panel in Reloaded. The MultiTrack panel is used to track multiple veejay servers and can be used to connect video streams.

If you have a few fast machines and a fast network at your disposal, you can easily drive 4 veejays simultaneously. The maximum number of tracks can be increased on reloaded's command line.

The MT panel provides synchronized playback controls

###Multi (Veejay) Tracker

Reloaded can track multiple veejay servers.

Double click the preview of the Track to have reloaded reconnect to that particular veejay-server.

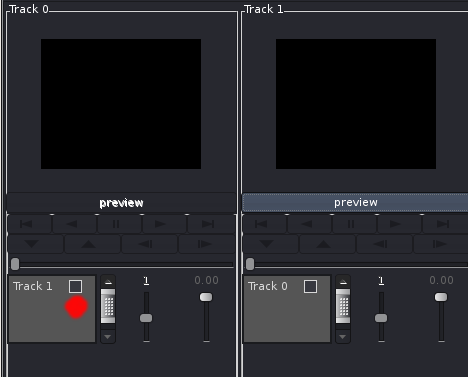
1. Click 'Add Track' (red dot) to add another veejay server to Reloaded

[

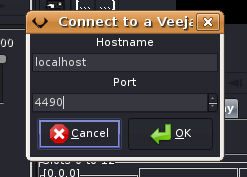
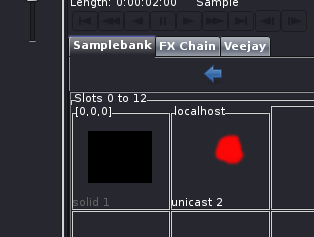
2. Fill in the connection details of the other veejay server

[

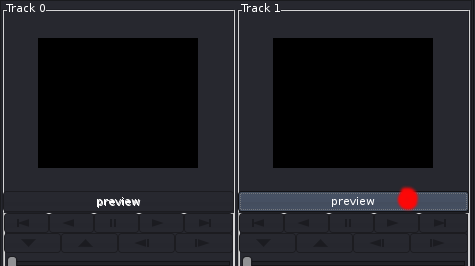
3. Click the preview togglebutton (red dot) to see what the other veejay server is delivering

[

4. Click the 'Track 1' checkbox of Track 0 (red dot) to use Track 1 as an input stream.

[

Start playing the newly created input stream

[caption id="attachment_187" align="alignnone" width="300" caption="Enable Track 1"][Enable Track 1[/caption]

read more »


Getting Started

needs merge with veejay basics

###First Time Run

Once you got veejay installed on your computer, you may need to configure it for your specific setup,

When veejay is run for the first time, it will create a .veejay/font directory in your $HOME.
It will look in this location to find a TrueType font file to use for the OSD display.
You can activate various OSD's by pressing CTRL-o , CTRL-h , CTRL-c in the video window.

Once you have choosen a font and put it into $HOME/.veejay/font, it is time to configure the dimensions and position of the video window.
For example, you have a dual screen setup with one big desktop of 2624x1024 and you'd like the video to be displayed on the the second screen (right) you'd set the VEEJAY_SCREEN_GEOMETRY and VEEJAY_SCREEN_SIZE environment variables:

$ export VEEJAY_SCREEN_GEOMETRY=2624x1024+1600x0

Then, you can specify the size of the video window

$ export VEEJAY_SCREEN_SIZE=1024x768

On the other hand, if veejay would just run on a single screen (performance/installation mode) you can use SDL's fullscreen option.

$ export VEEJAY_FULLSCREEN=1

Also, if you have any video capture hardware ( DV1394, Video4Linux) you can choose between two video capture drivers:
a) The built-in Video4Linux module, as "v4lutils"
b) Libunicap, which is a library to accesses different kinds of capture devices, as "unicap"

For example,

$ export VEEJAY_CAPTURE_DRIVER=unicap`

Finally, you may want to change the default capture channel of your video card. If you always use Composite/S-Video input, you will want this.

$ export VEEJAY_DEFAULT_CHANNEL=1`

Optionally, you can tell Veejay to load 3rd party plugins by specifying paths in the textfile $HOME/.veejay/plugins

For example

/usr/local/lib/freeframe
/usr/local/lib/frei0r-1>

There are more environment variables described in
$ man veejay

Running Veejay

There are several ways to start using Veejay. Very often veejay is started in Dummy mode (Showing black video) and Samples are created by loading a Video File in Reloaded. Another way to start veejay is to feed it some videofiles on the commandline; i.e. veejay -v .avi. Veejay will place all videofiles entered on the commandline in one big Edit Descision List and start playing in plain mode. Now, you can use the left and right bracket keys on your keyboard to set in- and out points for the sample to be created. Pressing the right bracket ']' will create a new sample. Switching from sample to plain mode can be done with '/' , the keys F1 to F12 play sample1 to sample*12,

You can use the number keys (1-9) to select a sample bank (i.e, sample 24 would reside in bank 2)

Use the a,s,d,f,g,h,j,k,l keys to set a speed multiplier (from left to right, 1x,2x,3x,4x (=f)) or use the ALT modifier for slow motion multipliers.

The numeric keypad can be used for video navigation, KP1-KP9 are used for forward/backward play, prev/next frame and jumping. The key KP* can be used to change the looptype from normal to pingpong (bounce)

When using the console, all FX are in one linear list. You can scroll it by pressing the Up/Down arrow keys. Activing the FX can be done by pressing Return or Enter. Then, you can configure the parameters by pressing PgUp/PgDn (parameter 0), KP Insert/KP Delete (parameter 1) , ,/. (parameter 2) and all the way from 3 to 8 with q,w,e,r,t,y,u,i,o,p

You can use the KP Minus/KP Plus keys to select a slot for the FX, You have 20 such slots.

Last but not least, you can change the Mixing Source by pressing '/' (Stream/Sample mode) and the Mixing Channel (key - and key +)

There are many more keys, but there's an overview in the MAN page.

Olivier Broquet made a startup script for veejay. It is capable of auto connecting your MIDI devices, starting and stopping veejay and reloaded.
You can use it as a boiler plate to cook your own.

# !/bin/sh

DESKTOP_SIZE=2304x800

DISPLAY_SCREEN_POS=1280x0
DISPLAY_SCREEN_SIZE=1024x768

SRC_WIDTH=720
SRC_HEIGHT=576

MIDI_BCR_ID=20
MIDI_ACONNECT_I_TO_RELOADED="$MIDI_BCR_ID:0 $MIDI_BCR_ID:1 $MIDI_BCR_ID:2"
MIDI_ID_128="128:0"
MIDI_ID_129="129:0"

export VEEJAY_SCREEN_GEOMETRY=$DESKTOP_SIZE+$DISPLAY_SCREEN_POS
export VEEJAY_SCREEN_SIZE=$DISPLAY_SCREEN_SIZE
export VEEJAY_PERFORMANCE=quality

case "$1" in
server)
veejay -v -d -w$SRC_WIDTH -h$SRC_HEIGHT
;;
client)
reloaded -v
;;
radar)
cd /home/ob/install/video/veejay/veejay-1.4.5/veejay-radar/
./radar
;;
midi128)
for inp in $MIDI_ACONNECT_I_TO_RELOADED
do
aconnect $inp $MIDI_ID_128
done
aconnect -o -l
sleep 10
;;
midi129)
for inp in $MIDI_ACONNECT_I_TO_RELOADED
do
aconnect $inp $MIDI_ID_129
done
aconnect -o -l
sleep 10
;;
vims_list)
veejay -u -n | less
;;
vims_res)
cat reserved_vims
;;
load)
sayVIMS -m "056:0 $2;"
;;
load_list)
exec 0<$2
while read ligne
do
$0 load $ligne
done
;;
save_playlist)

;;
load_playlist)

;;
stop_server)
killall -9 veejay
;;
stop_client)
killall -9 reloaded
;;
stop_radar)
killall -9 radar
;;
start_server)
gnome-terminal --tab -x $0 server --title veejay
;;
start_client)
gnome-terminal --tab -x $0 client --title reloaded
;;

start_radar)
gnome-terminal --tab -x $0 radar --title radar
;;
start_midi128)
gnome-terminal --tab -x $0 midi128 --title midi128
;;

start_midi129)
gnome-terminal --tab -x $0 midi129 --title midi129
;;

esac

read more »


debugging veejay

To help us fix things in veejay faster, please provide the following
information:

  1. full veejay console output
    (always run veejay with the '-v' commandline option)

In case of segmentation faults,

  1. Run configure with '--enable-debug' for both server and client
  2. Run veejay-server and reloaded in the debugger

    $ gdb /full/path/to/veejay (gdb) r -v /path/to/some/videofile.avi

  3. When it crashes,

    (gdb) bt

And copy&paste the output

Also, valgrind is an excellent tool for debugging veejay, I'm always interested in a few valgrind logs to make veejay more robuust. This will only be usefull if you have run configure with --enable-debug (from a clean source tree)

$ valgrind --log-file=/tmp/veejay.log --leak-resolution=high --leak-
check=full /full/path/to/veejay -v /path/to/videofile.avi

read more »