Veejay Vinyl Control

This guide is aimed to use Serato or Traktor timecode with VeeJay's playback. You need to have VeeJay server, Reloaded, sendVIMS and Puredata already installed. Also we need Jackd daemon, in this example I'll use QJackCtl to set audio connection and configuration.
In order to make it work we'll need:

[

Build flext could be not so easy, so I give you a little guide. Let's build flext with the build bash script:

./build.sh pd gcc
Then a few configuration files will be created. Now we have to move to buildsys/config-lnx-pd-gcc.txt and edit some lines to point at PD directories, in my case:

PDPATH=/usr/include/pd
and

INSTPATH=/usr/lib/pd/extra
There's no need to build Flext with SndObj and STK support, so we can comment that lines.
Then we run as root:

./build.sh pd gcc install
We can also build Flext with autoconf:

./bootstrap.sh
Then we run:

./configure --with-sdkdir=/usr/include/pd/extra
make
make install
By now we should have Flext installed, move on to build vinylcontrol~:
We can download vinylcontrol src, or just the vinylcontrol~.pd_linux and make a copy to our external puredata directory from http://karhumusic.sesser.at/vinylcontrol/vinylcontrol.html
Installation of vinylcontrol src is almost the same that flext.
First:

./build.sh pd gcc
Again we have to edit the file buildsys/config-lnx-pd-gcc.txt and then install as root:

./build.sh pd gcc install
Now the system is ready to control the video playback with a vinyl control or scratch live control cd.
At first, load your video, then open QJackCtl and start the server. Open Puredata and connect the deck or CDJ to Puredata input.

Load VeeJayVinylControl.pd, and you'll be able to start scratching your video!! Let's explain how it work and how we can calibrate the patch in order to get it working better.

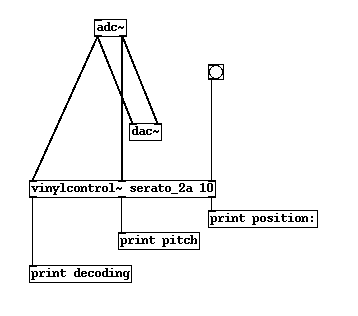
The external provide 3 outlets:
1) alive - bang is sent when the decoding starts/stops (ie. input is above a certain threshold and timecode is being tracked)
2) pitch - float that is 1 at 33 rpm in forward direction; negative values indicate backward-movement
3) relative position; the start is the first cue-point (first tracked timecode where the needle was dropped) and can be reset to the current timecode-position by sending a bang to the third inlet. The end position is the last sane timecode on the record. The position is calculated using (current_position-start_position)/(last_position-start_posit ion), thus giving a range between 0 and 1 between the end position and the relative start position and negative values for positions before the start position.

And 3 inlets:
1) left input
2) right input (take care of the cabling from your turntable)
3) reset for the relative start position

[

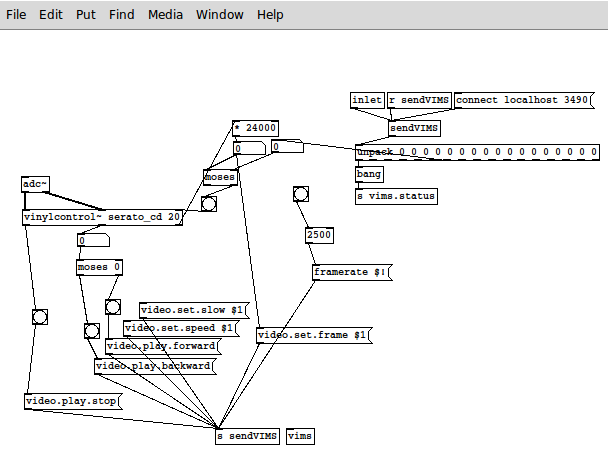
The external doesn't work perfectly, so you have to measure the audio input gain until the number on the 3rd patch outlet increases when the vinyl starts. This is multiplied by the frame's number of our video (I think that it could be took from VeeJay, but I'm not too sure), and is connected to veejay current frame.

The 2nd outlet have a "moses 0" message box, that means that when it's under 0 it will play the video backward, and when is above 0 it will play forward.

The 1st outlet just bang the play/stop. It uses a threshold that I'm almost sure it's defined by the timecode.c file.

That's all, the patch doesn't work perfectly, so if you make something better, let me know: juanicotolengo(at)gmail(dot)com
Thanks to DJ Trip's Cris, Niels Elburg and Matthijs van Henten for their support.

Juan Sebastian Faccio (a.k.a.: DaNoiseMan)

read more »


Projection Mapping

###Linux VJ Projection Mapping using Veejay + LPMT
The output from Veejay may be used as a real-time projection-mapped surface using a program called Little Projection-Mapping Tool (LPMT). Using more than one projection-mapped Veejay instance should be possible, but is not covered by this document. Video is shared between the two applications using the v4l2loopback kernel module.

LPMT - Little Projection-Mapping Tool; is a simple and powerful cross-platform tool for Projection-Mapping. Based on OpenFrameworks C++ toolkit.

Both Veejay and LPMT are Free software with source code released under versions of the GNU GPL. Also, both can be controlled through OSC messages allowing them to play nicely with custom clients and other warez.

WEBSITES:

REFERENCES:

INSTALLATION:

* v4l2loopback  
$ git clone <https://github.com/umlaeute/v4l2loopback.git> v4l2loopback  
$ cd v4l2loopback  
$ make && sudo make install  

Load the v4l2loopback kernel module:  
$ sudo modprobe v4l2loopback  

* yuv4mpeg_to_v4l2  
A tiny example application included with the v4l2loopback source code  
is used to stream YUV4MPEG output from Veejay into a v4l2 device.  
$ cd v4l2loopback/examples  
$ make yuv4mpeg_to_v4l2  

You may want to manually install the resulting yuv4mpeg_to_v4l2 binary  
somewhere in your $PATH for easier execution.  

* LPMT:  
Either, Download a pre-compiled binary:<http://hv-a.com/lpmt/?page_id=63>  
Or, Luke, use the Source:<http://hv-a.com/lpmt/?page_id=70>  

The following instructions are based on usage of the 64bit Linux binary.  
There's no real installation of the binary, run LPMT from its directory:  

$ tar -xjf lpmt_1.4_linux_x64.tar.bz2  
$ cd lpmt_1.4_linux_x64  
$ ./lpmt

Play around, LPMT is cool! Press h for a command overview and refer to the manual for more help.

CONFIGURATION:

When the v4l2loopback kernel module is successfully loaded, it will create a device at /dev/videoX where "X" is a number that depends on how many video devices you already have loaded. My computer has a connected webcam so this is what I have:

$ ls -l /dev/video*  
crw-rw----+ 1 root video 81, 0 Nov 15 15:12 /dev/video0  
crw-rw----+ 1 root video 81, 1 Nov 15 23:02 /dev/video1

/dev/video0 is my webcam (because it was already loaded first) and /dev/video1 is the v4l2loopback video device -- it is the most recently created device with the highest number. The rest of this document uses /dev/video1 as the v4l2loopback device, substitute according to your setup. Make sure the system user that will be running Veejay and LPMT has permission to read and write to the device. In my case, my user needs to be in the "video" group.

Now, to configure LPMT. In the directory containing the lpmt binary, you should also find a "data" and "libs" directory.

$ ls lpmt_1.4_linux_x64  
data  
libs  
lpmt

Edit data/config.xml and add a CAMERA section with the WIDTH and HEIGHT set to the dimensions of your Veejay output and ID set to "X" (the number of the /dev/video device created by the v4l2loopback module). My CAMERAS section looks like this:

<CAMERAS>  
<CAMERA>  
<WIDTH>640</WIDTH>  
<HEIGHT>480</HEIGHT>  
<ID>0</ID>  
</CAMERA>  
<CAMERA>  
<WIDTH>720</WIDTH>  
<HEIGHT>480</HEIGHT>  
<ID>1</ID>  
</CAMERA>  
</CAMERAS>

Configuration is complete!

EXECUTION:

You may want to use several terminal windows for this. You may need to specify the full path of the executables depending on where you installed them and if they are in your $PATH.

Create a named pipe:  
$ mkfifo /tmp/pipe  

Feed the video loopback device with yuv4mpeg (Y4M) data that enters the pipe:  
$ yuv4mpeg_to_v4l2 /dev/video1 < /tmp/pipe  

Start veejay, directing a Y4M output stream to the pipe:  
$ veejay --output 4 --output-file /tmp/pipe  

Start LPMT  
$ lpmt

Refer to the LPMT manual for how to configure your projection mapping. Do this to see veejay output right away:

  • press F2 (or x)

  • click cam on/off to enable it. You may need to select a different camera number from the select camera list.

CONCLUSION:

Epic!!! A Free VJ projection mapping solution for Linux! Thanks to all the people who have created these open source softwares and for their foresight and attention that has enabled interoperability.

read more »


Compiling on Ubuntu

##warning this documentation is a bit out of date

You could access to some fresh veggie-meat to build under mint 17.1 (rebecca). Please contact us if you need help.

1. Introduction

Compiling Veejay is not hard; however, there are a number of caveats to be ware of. The following document is intended to guide you trough a number of steps needed to start compiling, and hopefully, running veejay on Ubuntu/Debian based distro's. You will need to type in some commands in the terminal; The final steps in this document will assume that you can move around a bit on the commandline too

2. Versions

Software versions used in this document refer to Ubuntu 10.04 LTS/Lucid Lynx and veejay v1.5.9-4 retrieved from Git. Since both ubuntu and veejay are moving targets, we advice you to always try and use the latest versions available. When in trouble, just contact us.

3. Prerequisite

Ubuntu 10.x: Veejay uses a set of packages called "libavutils". The versions shipped by ubuntu may not be up-to-date. I've found the "MOTU Media" packages of excellent quality and use those instead.(https://launchpad.net/~motumedia/+archive/ppa) . You may add the MOTU repositories using the following command: $ sudo apt-add-repository ppa:motumedia/ppa.

Also, note that you will need veejay 1.5.20 from git. This version of veejay works with ffmpeg-0.8.12 "Love".

Ubuntu 12.x:

Current master branch in git works with more recent versions of ffmpeg. The version installed by your apt-get install commands will be fine.

To compile veejay ( and software in general ) you need a list of additional packages installed that do not ship with the default installation of Ubuntu.
The list below lists all dependencies:

# Packages installed on Xubuntu 12.04 to run veejay  
*  and some dependencies compiled from source  
*   
*  `sudo apt-get install` these  

build-essential  
automake  
libtool  
cmake  

*  revision control  
git  

*  ffmpeg  
yasm  

*  veejay-server  
libgtk2.0-dev  
libx11-dev  
libxml2-dev  
libxinerama-dev  
libsdl1.2-dev  
libjack-dev  
libglib2.0-dev  
libquicktime-dev  
libmjpegtools-dev  
libjpeg62-dev  
libfreetype6-dev  
libdv4-dev  
libdirectfb-dev  
liblo-dev  

*  veejay-client  
libglade2-dev  

*  libunicap  
intltool  
libraw1394-dev  
libv4l-dev  

*  ucview  
*  libunicapgtk  
*  libucil  
libtheora-dev  
libvorbis-dev  
libxv-dev  
libgconf2-dev

4. Downloading veejay

The recommended wayUse GIT repository. This will contain the latest version and bugfixes of the current code. An alternative is to use a snapshot release. Git can be installed from synaptic. When looking for help, always supply the used versions of the software, as a bug may have been fixed in a later version.

Look here for a description of how to download veejay using git.

5. Compiling

After downloading and unpacking veejay you should have a directory tree that looks like this:

veejay-git/  
`-- veejay-current  
|-- sendVIMS  
|-- veejay-client  
|-- veejay-server  
|-- veejay-themes  
`-- veejay-utils

As you can see, veejay has been split up in a number of different "packages". These packages have to be compiled separately, but in a specific order.

We'll start by compiling veejay-server:

$cd veejay-server  
$export PKG_CONFIG_PATH=/usr/lib/pkgconfig  
$./autogen.sh  
$./configure --prefix=/usr  
$make -j2  
$sudo make install

Notes:

Make sure that PKG_CONFIG_PATH points to the directory containing the .pc files of the libraries veejay will be going to use! If you have build other libraries from source and installed them , for example to /opt, set /opt to be the first path on PKG_CONFIG_PATH and then include any other paths.

$ export PKG_CONFIG_PATH=/opt/lib/pkgconfig:/usr/lib/pkgconfig

If you run in trouble, you can launch ./build.sh and send us the output.

Next, veejay-client:

$cd ../veejay-client  
$export PKG_CONFIG_PATH=/usr/lib/pkgconfig  
$./autogen.sh  
$./configure --prefix=/usr  
$make -j2  
$sudo make install

And some themes:

$cd ../veejay-themes  
$sudo ./INSTALL.sh

That particular installation of veejay did not run without some fonts installed for the OSD. I'm sure that'll be fixed in the near future, but here's how to fix that:

$mkdir ~/.veejay & mkdir ~/.veejay/fonts  
$cp /usr/share/fonts/truetype/freefont/FreeSans.ttf .veejay/fonts/

You may now start veejay:

$veejay -d

And reloaded:

$reloaded

That's it, cheers!

read more »


MIDI

##Configuring the MIDI device

Reloaded supports MIDI devices through ALSA, which means you have to connect
your MIDI device to reloaded.

To start, launch reloaded
control@veejay-1:~$ reloaded -v

To list the input (readable) clients, type 'aconnect -i'
c0ntrol@veejay-1:~$ aconnect -i client 0: 'System' [type=kernel] 0 'Timer ' 1 'Announce ' client 14: 'Midi Through' [type=kernel] 0 'Midi Through Port-0' client 128: 'Virtual Keyboard' [type=user] 0 'Virtual Keyboard'

To list the output (writeable) clients, type 'aconnect -o'
control@veejay-1:~$ aconnect -o client 14: 'Midi Through' [type=kernel] 0 'Midi Through Port-0' client 129: 'Veejay' [type=user] 0 'Reloaded '

Now, we can connect the input to the output, Virtual Keyboard to Reloaded with
$ aconnect 128 129

We'r done on the commandline now and we can start learning midi events in
reloaded. Click GVeejay -> Midi -> Learn Midi
[caption id="attachment_173" align="alignnone" width="314" caption="MIDI"][MIDI[/caption]

In the statusbar , you will see the message 'Learning MIDI commands. Touch a midi key and then click a widget.' . Now, we can bind for example NoteOn to the Play Forward button by hitting the note on the keyboard and then by pressing the play forward button. Reloaded will learn MIDI events until you click 'Enable MIDI' in the menu.

The MIDI events can be saved to file by clicking GVeejay -> Save -> Save MIDI layout

read more »


Projector/Camera Calibration - Augmented reality

Use veejay 1.4 to calibrate your camera against a projector or a monitor screen in order to calculate the position of a physical object.

###Calibration
Press CTRL-s to bring up the setup screen:

As shown in the preview, the camera was mounted with an angle and doesnt capture the full projection area. We simply select the edges of the projection we see in the camera image, select forward transformation and press CTRL-s again to leave the setup.

Setup screen


After pressing CTRL-s, we return to our now calibrated camera image.
This image you can use to process it for motion detection. In order to have veejay pre process filters on your camera stream while playing a sample press CTRL-d

read more »


How to use MIDI

Reloaded 1.0 supports MIDI devices through ALSA

To use your MIDI device with Reloaded, you need to use aconnect or
aconnectgui to connect the MIDI device to Reloaded.

To see all input devices (your MIDI devices)
$ aconnect -i

And all output devices (Reloaded/ Veejay)
`
$ aconnect -o

And then connect them:
`
$ aconnect -i 127 -o 128

Launch Reloaded

$ reloaded

Instruction for MIDI learning:

In the menubar, click GVeejay -> MIDI -> MIDI learn
Press a key on your MIDI device (reloaded will display the raw MIDI event in the statusbar)
and click a button , press a key or pull a slider in the userinterface to associate
a particular event with a MIDI note, pitch or velocity key.
Once you have assigned the MIDI notes to VIMS, you can save the
MIDI preset and enable MIDI (GVeejay -> Save -> MIDI layout) and
(GVeejay -> MIDI -> MIDI enable)``

read more »